Note: This excerpt was adapted from Butcher On The Block: Everyday Recipes, Stories, and Inspirations from Your Local Butcher and Beyond by Matt Moore.
“I like to call myself a ‘live to eater,’ my entire life revolves around food,” says James Peisker, who wields a sharp boning knife in one hand and a cup of black coffee in the other. As a butcher, business owner, and COO of Porter Road Butcher in Nashville, Tennessee, James and cofounder Chris Carter have spent the past decade building an empire while also fulfilling their mission of fueling a better tomorrow through properly raised meats.
I called on James to showcase some of the basic skills and techniques that one might use to further their skills in butchering common items at home. Admittedly my request could come off as somewhat counterintuitive: Porter Road Butcher and butchers across the country make their living by serving their customers, creating custom cuts or orders on demand. But James was happy to oblige my ask by spending a day showcasing his skills and philosophy. “The fun part of my job is educating people—to enjoy food and cooking.”
Below I share some of the advice James imparted, along with specific techniques he demonstrated for butchering two common meats in your own kitchen.
A Primer on Butchering at Home
This primer is for those looking to get started with butchering at home.
Beyond the traditional array of texts and books devoted to this subject, I also encourage and promote those seeking more refined knowledge to take advantage of technology—videos, podcasts, applications, online education, as well as virtual events; these are now widely available to take your butchering to the next level. But in my humble opinion, whatever your method of self-study, it is also best polished off with creating a relationship with your own local butcher, as the trend of sharing knowledge within this trade is contagious.
On that note, a defining characteristic that I uncovered throughout my travels is that most butchers learn the art of butchering just as much through trial and error as they do through apprenticeship. And while the trade has thousands of years of refinement, it continues to evolve. Practicing and learning these techniques, whether basic or in-depth, can provide a lifetime of enjoyment and self-improvement, not to mention an opportunity to pass on knowledge and passion to those that follow.
The Environment
Unlike in the old days, modern butcher shops do not typically contain sawdust-laden floors with mineral-scented, funky air. Primarily you will find a well-lit, well-designed shop that’s squeaky clean. As James says, it all changed after The Jungle, Upton Sinclair’s novel that exposed the meat processing industry of the past, ushering in new standards and regulations that are still practiced today. If you plan to handle raw meats and other items at home, you should follow the practices embraced by professionals.
At home, the countertop is typically the most stable and best surface for butchering. It should be cleaned and sanitized regularly. Ideally the countertop is also at a comfortable height. Leveraging the steady counter for cutting and chopping is vital, but using gravity to rest certain items on the counter, while pulling or tearing other items that hang from the surface, can also be useful when working with larger portions. If you are working in a tighter kitchen, be aware of any other items that might be around the butchering area that should be moved prior to working, like a fruit bowl, as you want to eliminate the chance of unintentionally contaminating other surfaces or items. If countertop space is an issue, any sturdy, sanitized surface can be used, such as a table or dedicated butcher block.
Having access to a nearby trash can will allow you to easily discard items without touching other surfaces. Of course, keeping your hands and other items clean is of vital importance, so a sink in which to wash your hands and tools with warm water and antimicrobial soap throughout the process is ideal. When you have finished your work, it’s important to properly clean and sanitize the surfaces and any tools used during the practice.
Also, be mindful of your clothing. Since sometimes the practice can be messy, it’s best to wear a washable apron or clothing.
Like most things in life, preparation is key here. I like to create a mental game plan of my process in advance so that I’m not running back and forth, potentially contaminating other surfaces, like the handles of my refrigerator and cabinet pulls. If you are storing larger quantities, be sure to have plenty of ice and storage options on hand, and clear out room in your refrigerators and freezers prior to starting your routine.
The more thought out your process, the better your results and the easier your cleanup.
The Tools
I pressed James on what items are necessary for butchering at home, and I got a sense he’s somewhat of a minimalist. “Find a sharp knife that you are comfortable with—that’s all you really need,” he says. For James, that sharp knife really means two boning knives: one that is stiff and another that is semi-flexible. The stiff knife can be used for jobs that require more heavy-duty work, such as cutting through joints, small bones, and cartilage, whereas the semi-flexible boning knife has a bit of give to it, something that comes in handy when filleting a fish or trimming away silver skin from a tenderloin. So while a sharp knife is James’s primary tool for the trade, I do gather a few more items that are helpful for the at-home butcher, which can be sourced at most kitchen supply stores or online outlets.
- Knives
- Stiff and semi-flexible boning knives, breaking knives, paring knives, heavy-weight cleaver.
- Honing/Sharpening Steel
- Used to hone the blade of a sharpened knife.
- Sharpening Tool or Machine to Sharpen Knives at Home
- Note: Several kitchen-supply or retail locations as well as mail-order companies now conveniently offer this service.
- Boning Hooks
- Used to secure meats on a cutting board when butchering.
- Gambrels
- Used to suspend or hang cuts of meat.
- Cut-Resistant Mesh Gloves
- Kitchen Apron
- Kitchen Shears
- Butcher Paper
- Butcher’s Twine
- Masking Tape
- Used to secure wrapped butcher paper, if desired.
- Sharpie Marker
- Keep handy to denote contents and dates of wrapped items.
- Cutting Boards
- Ideally a board solely dedicated for use with poultry.
- Storage Vessels
- Baking sheets, wire racks, sealable containers, and bags.
- Clean Towels
- Hand Soap and Dish Soap
- Nontoxic and Antimicrobial Cleaners
- If you prefer to avoid harsh chemicals, you can create your own cleaning solution to use on countertops, cabinets, cutting boards, and other surfaces. Simply combine 1 cup of white distilled vinegar with 1 cup of distilled water. A few drops of lemon and/or orange essential oils can be added to enhance the cleaning power and provide a clean scent. Note: Due to the acidity of the vinegar, it’s best to avoid using this on softer stone surfaces such as granite or marble.
- First Aid Kit
Common Butchering Techniques
A whole chicken and a beef tenderloin are two meats that can be usefully butchered at home. Here are step-by-step guides on how to do so.
Whole Chicken
In my mind, breaking down a whole chicken is a necessary skill for the avid home cook. Yet whenever I find myself perusing my local grocery store, I can almost spot the fear in people’s eyes when it comes to breaking down a whole bird.
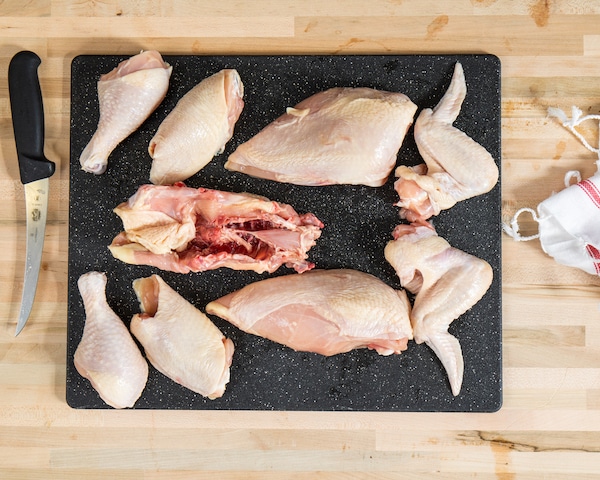
First and foremost, buying the entire chicken is typically at least 20 to 30 percent cheaper than purchasing a single cut. You get the best of all worlds: a nice selection of white and dark meat to feed the family, while also putting that backbone or other trimmings in the freezer for a stock to elevate the rest of your meals. That said, not all chickens are created equal. James is a big believer in sourcing hormone-free birds that have plenty of territory to roam. You can taste the results—the meat is a touch darker in color, more flavorful, and super tender. As mentioned previously, it’s a good practice to always dedicate a plastic board solely to working with poultry. The following method is just one way (James’s way) of breaking down a chicken, which can be emulated for turkey as well as game birds. That said, there are many different techniques that you can utilize to get a similar result.
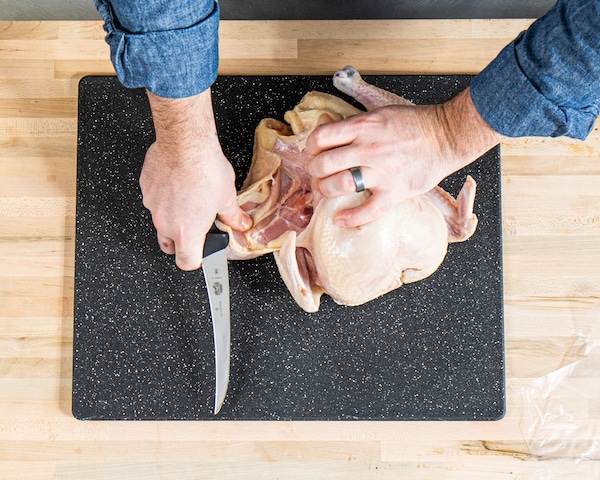
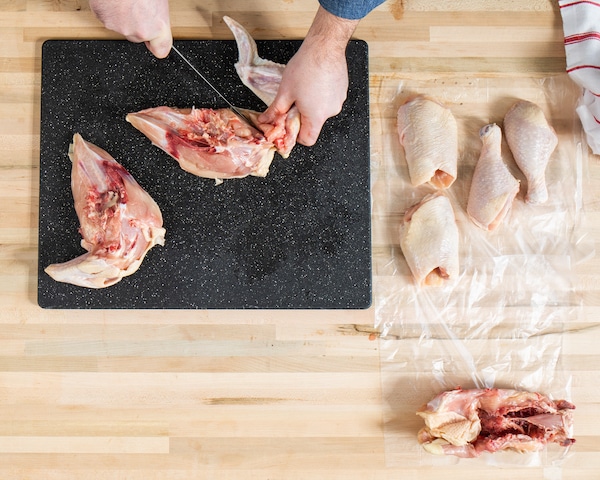
1. With the breast up and butt end of the bird facing you, pull the legs of the chicken to loosen and, using a stiff boning knife, slice through the skin to expose the legs.
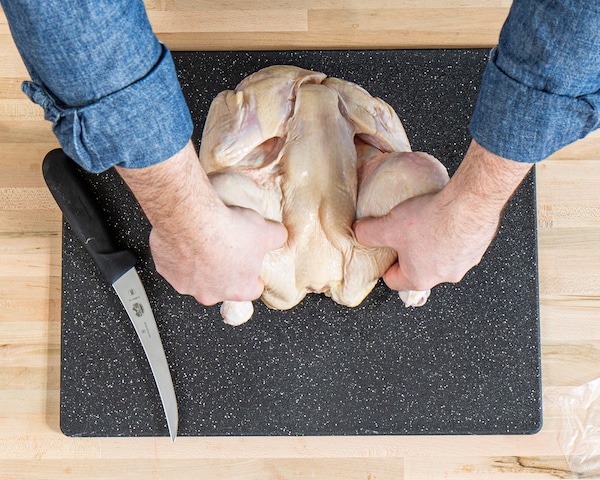
2. Turn the chicken over, and using your hands, pop the thigh bones out of the sockets by pulling the legs to the backbone.
3. Shove your thumb into the oyster, the small circular piece of dark meat on the back of the thigh, and invert the legs, slicing each thigh away from the back—there should be little resistance when following the natural break of the thigh bone.
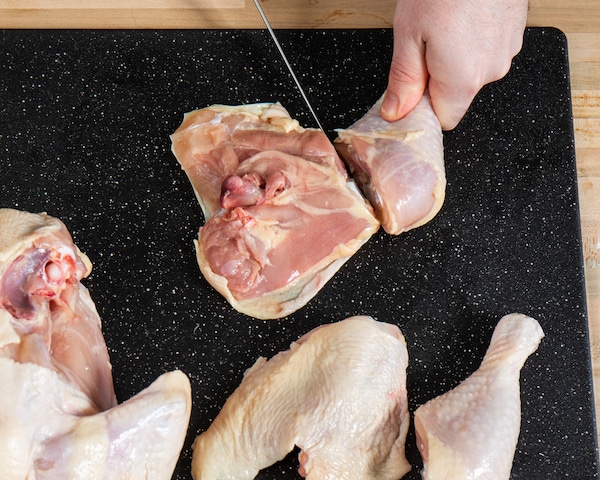
4. Separate the legs from the thighs, using your knife to follow the thin line of fat as a guide to the joint.
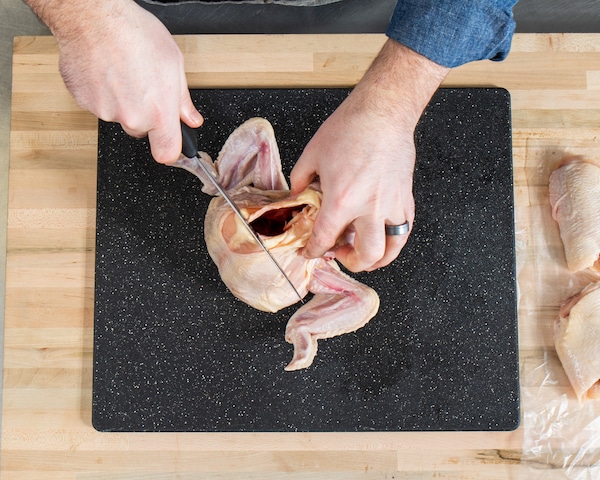
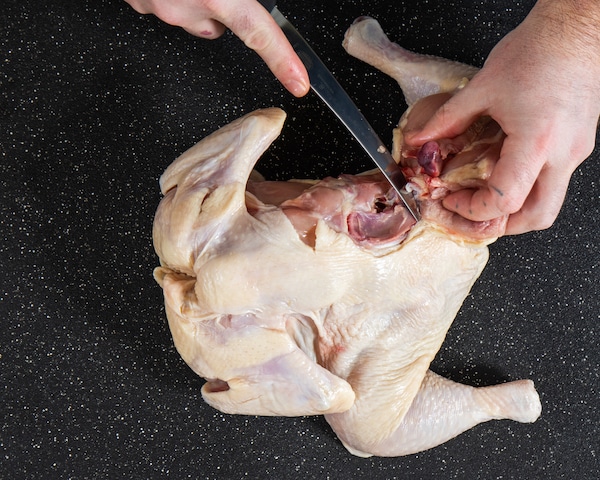
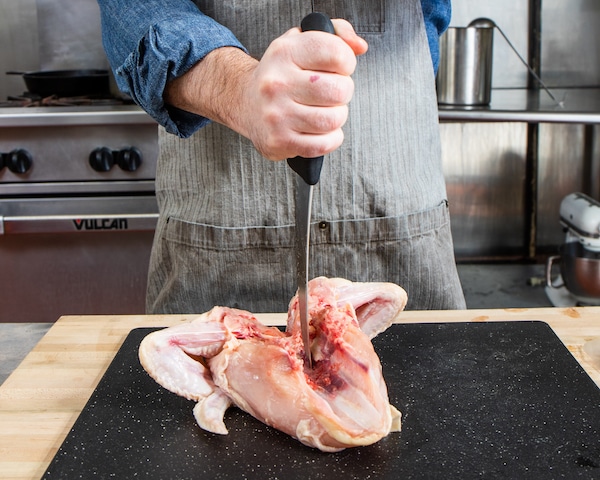
5. Rotate the chicken, placing the neck portion on the board, and use the knife to follow the natural seam to remove the backbone from the breastplate, using a bit of force to cut through the rib bones.
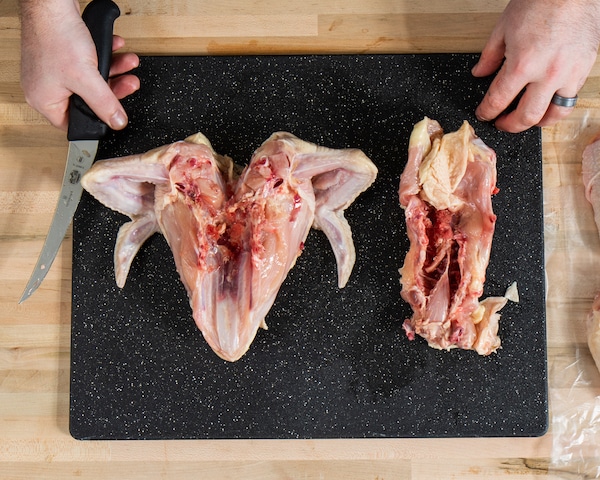
6. Using the point of the knife, stab into the middle of the breastplate, and slice the breastplate to cleanly separate the two breasts.
7. Pop the wing out of the socket from one of the breasts, and slice the wing at the joint away from the breast. Repeat with the remaining breast.
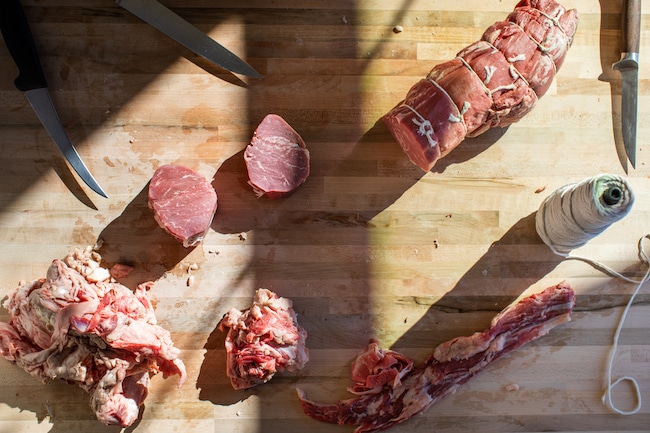
Whole Beef Tenderloin
As with breaking down a chicken, this simple technique allows you to purchase whole tenderloins, carving them into a large roast to feed a crowd, or slicing into individual steaks.
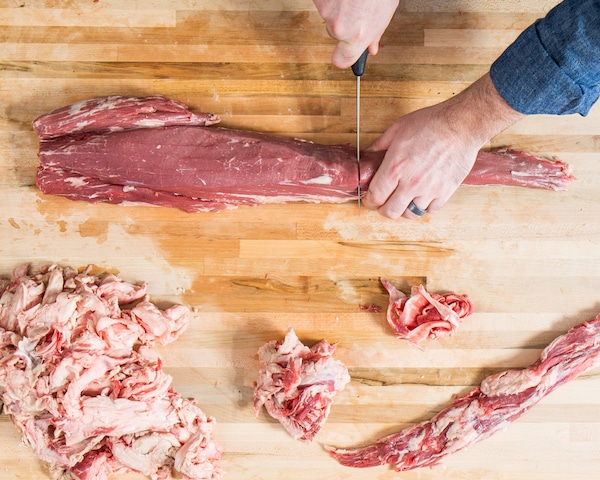
Often during the holiday season, you will find steep discounts on whole tenderloins, and breaking them down at home is a realistic and affordable way to put those discounts to good use. A whole tenderloin consists of the head, center (or chateaubriand), and tail, and it’s typically composed of two chains of meat. Don’t fret if you are already confused—the biggest advice I can relay here is to use your hands. Follow the natural lines of the meat and you’ll be just fine.
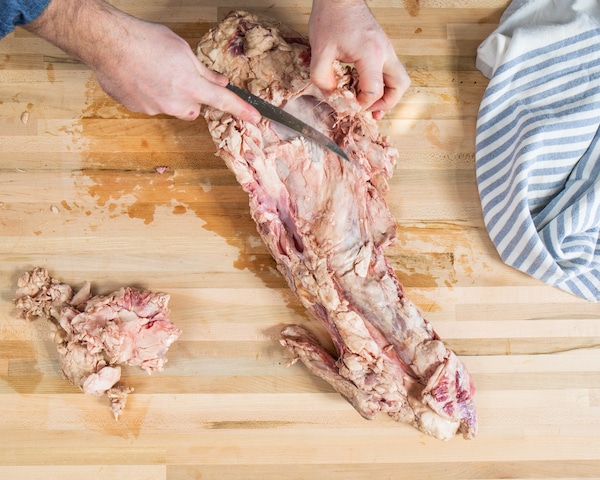
1. Using your hands, pull away the excess fat, or suet, from the meat. Most of the fat will pull easily and naturally from the tenderloin, but as necessary, a knife can be used to trim away any stubborn portions that do not simply peel away.
2. Slide your hands down the tenderloin, with your thumb in the center, to find the seam between the two chains of the meat. One of the chains will be roughly 30 percent smaller in size than the other, typically with more fat. Trim the smaller chain away from the tenderloin (this piece of meat can be ground for burgers, or pounded thin for fajita or other stew meat).
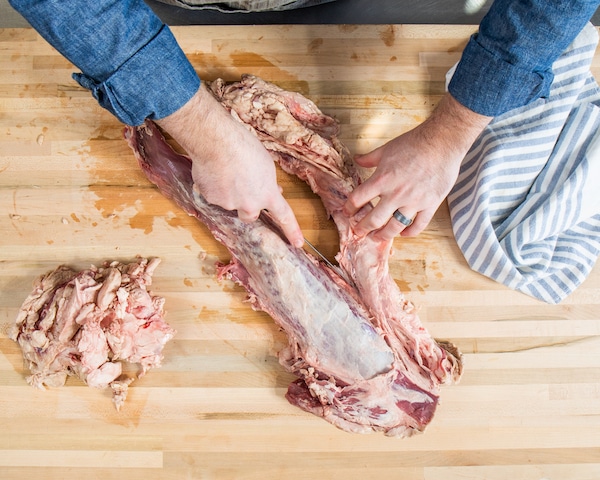
3. Working with the larger chain, carefully use your knife to trim away the silver skin and any additional excess fat from the meat. The key to removing the silver skin without having any waste is to pull on the silver skin back and forth, allowing the knife to gently cut it away.
4. Looking at the smaller tail portion, determine the point at which the tail could be folded under the tenderloin to create a consistent thickness throughout.
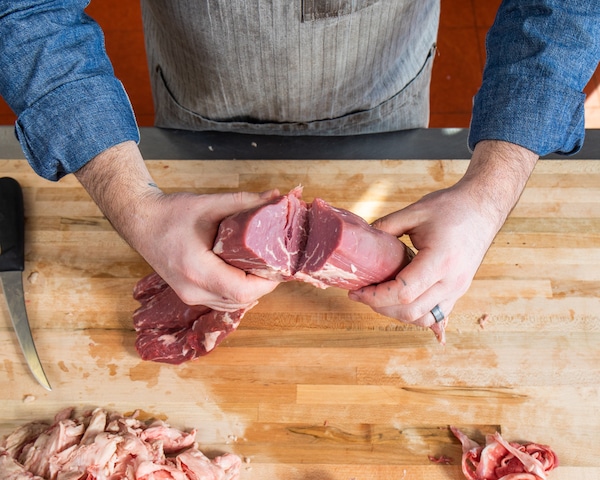
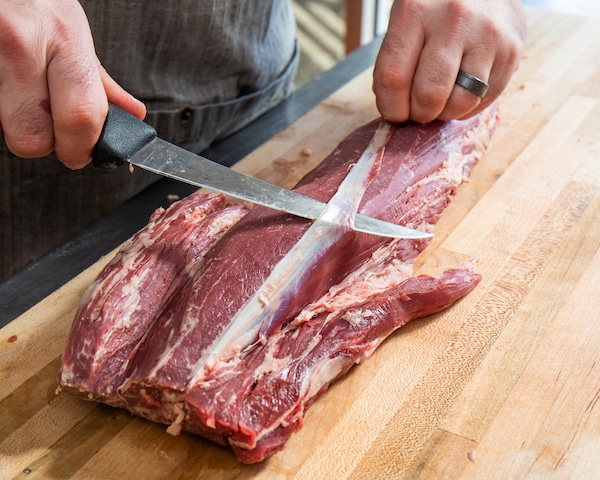
5. At that point, use your knife to cut the tail of the tenderloin roughly 75 percent through the meat and fold the tail underneath the tenderloin to have an even, consistent piece of meat.
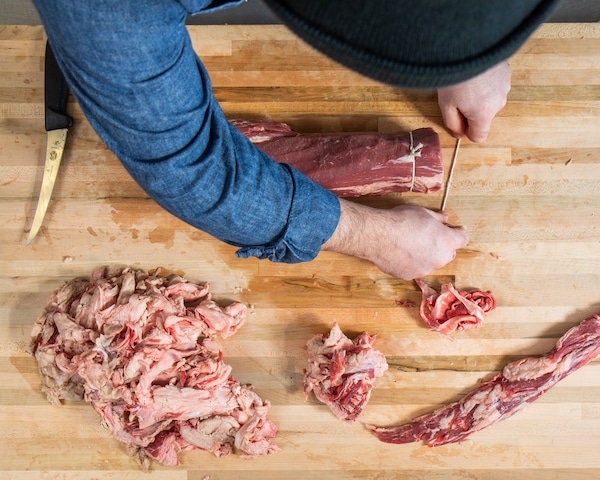
6. To single tie the roast, use butcher’s twine to go underneath the tenderloin, and wrap the twine onto itself two times to hold it in place. Tie a standard knot firmly to secure the twine. Continue in this method until the entire tenderloin is evenly tied. This method is most useful if you desire to cut the loin into individual steaks, secured by the twine.
7. If cooking the entire tenderloin, you can use a continuous knot method by once again going underneath the tenderloin to tie a secure knot for the first hold. Wrap the twine around your hands to create a circle, and slide that circle down and around the tenderloin, pull on the line to tighten, and once again create a new circle in your hand and slide that circle down and around the tenderloin, repeating the method until the tenderloin is firmly tied, and finishing the tying with a final knot at the end.
8. Trim into individual steaks or leave whole, as desired.
_______________________